We have been asked this by several clients – How do we do our Garage Floor Installation? We thought we’d put together a little more detailed description and show photos so you can understand the process and the attention to detail we take.
Main Floor Preparation in the Garage Floor Installation Process
When we come out to measure to give you an estimate, we also can show you your floor color choices
Yes, we can work in cold temperatures!
1. We prep your garage with great detail. Here we are preparing the stem wall and removing nails from the forms
1. Preparation- In this garage we needed to remove the previous coating
2. Repairing cracks on the floor
2. Floor Preparation - we take great care to make sure the floor is well prepared for your new floor
2. Here we are preparing the stem wall
3. Caulking Expansion Joints - this is an option you add add for your job
3. More prep - Sanding Steps
4. Floor Preparation Grinding - for this we use the Swing Machine. It is very important to get the floors prepped for the product
5. Vacuuming really well before the Primer Coat
6. Yes, we can get into hard to fit and tight places
6. Rolling the Primer Coat
7. Rolling the Pigmented Coat before Flake
7. Broadcasting Flake - aren't those nice shoes!
8. Recovering Excess Flake
8. Final Vacuum before Top Coat
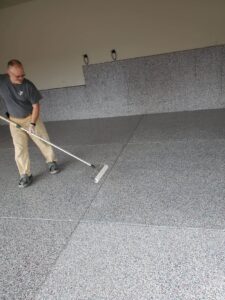
9. Rolling Top Coat around edges and Expansion Joints
9. Top Coat on Steps
9. Rolling Top Coat
The final step - let it dry for 24-48 hours (depending upon temperatures) and you can use your garage!
1. We remove debris from all of the garage floor.
The important part of the process for this is knowing that it is critical to clean and remove debris from the floor and surrounding stem wall, along with under the sheetrock. This is necessary so that the debris doesn’t dislodge and get into the floor coatings later in the process. We take the extra time to do this thoroughly as it will give us a better finish. Concrete grinding and preparation are so important in the process of installing floor coating.
2. Next, we identify the areas that need to be patched and patch everything needed
This needs to be done early in the preparation process to let the patching product set so that the floor machine can knock down and level the patching product while doing the main floor.
3. Clean and Fill Expansion Joints – This is an option we offer with our floor coating service
If you choose this option, the expansion joints are cleaned out thoroughly before caulk is applied. This is not a process we typically recommend — expansion joints exist for a reason, and filling them can cause problems over time as the concrete continues to move. If you would like to learn more about why we advise against filling them, read our full article on expansion joints. If you still prefer to have them filled, it is available as an add-on at an additional charge.
4. Use a 20″ Orbital Grinder to remove contaminants, weaken latent material, and open the concrete to take the garage floor installation properly for our garage floor installation
What is a Orbital Grinder you ask? They are similar to floor buffers and are used for intensive cleaning and surface repair.
The 20″ Obital Grinder is run going both North/South and East/West to make sure all floor surfaces are covered. We also sweep between passes to verify that the grinding process is getting complete coverage. The floor will not be a constant color when done, but all areas must be free of contaminants.
5. Sweep/Vacuum concrete dust from the floor, expansion joints, steps, and stem wall
This step must be completed thoroughly before the product can be applied to the floor. A clean floor is a must for starting our application process.
6. We apply the first coat of our 3-coat system in our garage floor installation
We apply the primer or base coat.
7. We apply the second of our 3 coat system
We apply the second coat, which is pigmented, then broadcast the flake (or chips) of your choice while the resin is still wet. Read here on why we only do this in the second coat in our article on “When is it Best to Broadcast Flake”
8. We vacuum up the excess flake and prepare for the topcoat
We recover the excess flake and scrape in both directions to achieve a uniform profile and remove any protruding shark fin pieces that are sticking up. Vacuum the floor very well, then apply the top coat.
9. We apply the third of our 3 coat system for our garage floor installation
The very last thing we do is apply our Poloyaspartic top coat.
Here is a quick rundown…
After 24-48 hours, you may use your garage as normal.
Having a Polyaspartic floor coating installed in your garage can give you many benefits. The main benefit is that it’s a durable and long-lasting solution to your flooring needs. This type of flooring is resistant to abrasion, chemicals, and pressure, so it can withstand the wear and tear of everyday use. It’s also slip-resistant, so you won’t have to worry about slipping on it. Additionally, it can be installed quickly and is easy to clean. The coating is also resistant to UV rays, so it will last for years without fading or discoloring. With a Polyaspartic floor coating, you can enjoy a beautiful, durable, and low-maintenance garage floor installation. Give Colorado Springs Garage Floors a call and get your free estimate.
Ready to Stop Settling for a Floor That Just Gets By?
Colorado Springs Garage Floors has spent 16 years installing true 3-coat polyaspartic systems across the Pikes Peak region. Over 1,000 floors. A residential lifetime warranty that means something. If you're ready to see what your floor can actually look like, start with a free estimate.

 When we come out to measure to give you an estimate, we also can show you your floor color choices


